Description
Cable tray Installation-

Cable Tray Installation is an essential part of any electrical infrastructure project, providing a safe, organized, and efficient way to route and support electrical cables in both commercial and industrial settings. Proper cable tray installation ensures the safety, accessibility, and longevity of the cables while maintaining the system’s overall integrity.
Key Aspects of Cable Tray Installation:

- Planning and Design:
- Route Planning: Before installation, the exact path for the cable trays should be planned. The route must ensure minimal interference with other systems (HVAC, plumbing, etc.), accessibility for maintenance, and adherence to building codes and regulations.
- Tray Type Selection: Different types of cable trays are available, such as:
- Ladder Cable Trays: The most common type, featuring a ladder-like structure for cable placement.
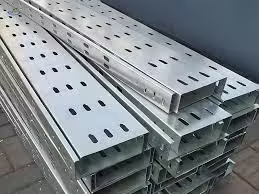
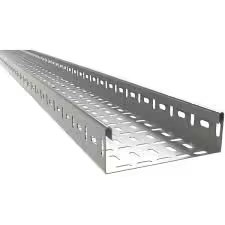
- Perforated Cable Trays: These trays have perforated sides to allow easy mounting of cables while also allowing airflow to dissipate heat.
- Solid Bottom Cable Trays: Used for cables requiring protection from dust, moisture, or chemicals.
- Trough Cable Trays: Similar to ladder trays but with sides, offering additional protection.
- Raceways and Wireways: For more confined spaces, wireways are used to encase cables.
- Material Selection:
- Material of Tray: Cable trays are made from various materials, including steel, aluminum, or fiberglass. The choice of material depends on factors like environmental conditions, load requirements, and safety regulations.
- Steel (Galvanized or Stainless): Used for standard industrial environments.
- Aluminum: Lightweight, corrosion-resistant, and used for less aggressive environments.
- Fiberglass: Used in areas prone to corrosive environments, like chemical plants.
- Tray Accessories: Accessories like couplings, elbows, tees, and connectors are needed to install cable trays in complex layouts.
- Material of Tray: Cable trays are made from various materials, including steel, aluminum, or fiberglass. The choice of material depends on factors like environmental conditions, load requirements, and safety regulations.
- Installation Process: The installation process involves several stages to ensure proper setup and functionality.

- Mounting Supports: The first step is to install the mounting brackets or supports on which the cable trays will be placed. These supports must be securely anchored to walls, ceilings, or floors, depending on the design of the facility.
- Spacing of Supports: Ensure proper spacing of supports to avoid sagging of the trays and to meet the weight capacity requirements. Typically, supports should be spaced 4 to 5 feet apart, depending on the tray size and load.
- Tray Assembly: Once the supports are installed, the trays are assembled. The sections of trays are connected using couplings or fasteners, ensuring alignment and secure attachment.
- Joining Sections: For longer runs, trays are joined together with connectors and bolts. Ensure that all joints are properly tightened to avoid any loose fittings.
- Angles and Bends: For changes in direction (horizontal or vertical), use pre-fabricated angle pieces or fabricate custom bends. These ensure that cables follow the path smoothly without undue stress.
- Tray Placement: Once the tray is assembled, it is carefully placed on the mounted supports. Ensure that the tray is level and properly aligned.
- Clearance for Cables: Leave enough space for cables to be placed easily and securely in the tray without overcrowding or stress.

CableTray Installation
- Mounting Supports: The first step is to install the mounting brackets or supports on which the cable trays will be placed. These supports must be securely anchored to walls, ceilings, or floors, depending on the design of the facility.
- Cable Routing:
- Cable Laying: Once the tray system is in place, the cables are carefully routed through the trays.

- Separation by Type: It’s a good practice to separate cables based on their function, such as power cables, communication cables, or control cables, to prevent interference.
- Cable Spacing: Cables should not be tightly packed in the trays. Adequate spacing allows for ventilation, reducing the risk of overheating.
- Weight Distribution: Make sure that the weight of the cables is evenly distributed in the trays to avoid overloading.
- Cable Tie-Off: Use cable ties or saddles to secure the cables in place, ensuring they do not shift over time. However, make sure that ties are not too tight as they could damage the cables.

- Cable Tray Covers:
- For additional protection, covers or lids may be added to the trays, especially in environments prone to dust, moisture, or mechanical damage. Covers can also help organize cables and provide a neat appearance.
- Testing and Inspection:
- Once the installation is complete, inspect the cable trays for proper alignment, secure fittings, and sufficient cable space.
- Clearance and Accessibility: Ensure that t
 he trays are installed with adequate clearance around them for easy access during maintenance.
 - Perform load testing if required, particularly if the cable tray is handling a significant load.
- Compliance with Standards:
- Ensure that the cable tray installation complies with local electrical codes, such as NEC (National Electrical Code), IEC (International Electrotechnical Commission), or any other relevant standards.
- Grounding: Grounding of the trays and associated equipment is critical for safety. Ensure that the trays are properly bonded and grounded to prevent electrical hazards.
Benefits of Cable Tray Installation:
- Efficient Cable Management: Provides an organized and easily accessible system for managing large volumes of cables, reducing the risk of accidental damage.
- Flexibility and Scalability: Allows for easy expansion, modification, or re-routing of cables as the system grows.
- Improved Airflow: Ensures adequate ventilation around cables, which helps in heat dissipation and minimizes the risk of overheating.
- Safety: Proper cable tray installation reduces the chances of cables being exposed to hazardous conditions, preventing potential safety risks such as fires or electric shocks.
- Cost-Effective: While initial installation might require investment, it offers long-term cost savings by reducing the need for repairs, upgrades, and cable replacements.


Ryder (verified owner) –
The product is firmly packed.
Robert (verified owner) –
Very well worth the money.
Phoenix (verified owner) –
Very well worth the money.
William (verified owner) –
Good quality.
Mateo (verified owner) –
Very fast delivery.
Samuel (verified owner) –
Very fast delivery.
Ryder (verified owner) –
Very fast delivery.
Ryan (verified owner) –
The product is firmly packed.